Obscure 1988 movie references aside, this is a quick write-up on the Git basics, just enough to get you from A to B. I’ve always used the command line for this stuff.

I know there are tools and GUIs out there, but honestly, this way’s always felt easier for me.
But anyway, maybe let’s talk about what Git is first.
What is Git?
Git is a version control system that helps you track changes and manage the history of your project over time. At its core, it gives you two powerful tools:
Branching – This lets you create a copy of your codebase so you can work independently. Your changes stay isolated, meaning they won’t affect the original code until you're ready.
Merging – Once your changes are complete and tested, merging brings your branch back into the main codebase, combining your work with the original project.
Remote Git repositories are hosted versions of your project that live online, making it easy to collaborate and share code. While I primarily use GitHub, other popular platforms include GitLab, Bitbucket, and Azure Repos. These services act as cloud-based hosts for your Git repositories.
Every change to the codebase is tracked, which means if something goes wrong, you can quickly roll back to a previous working state.
It’s an essential these days, I remember FTP’ing code changes to a server back in the day (and actually more recently) - and yeah, it’s outrageous that there’s firms out there still not using version control. It’s bloody 2025, Git was released 20 years ago!
Let’s talk about the workflow…
The Workflow
Here’s a simple project workflow and the CLI commands that help us move from one step to the next.
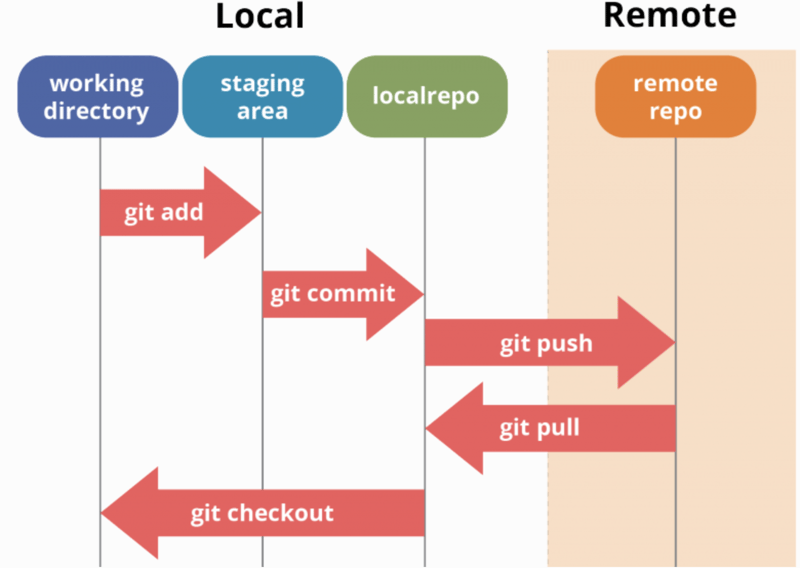
Let’s go into the above in a little detail:
Working Directory: The folder on your computer where you actively edit and manage your project files.
Staging Area: The place where you prepare and organise changes before committing them to the local repository.
Local Repository: Your personal Git database on your machine that stores committed snapshots of your project history.
Remote Repository: The Git repository hosted on a server (like GitHub) where you push your local commits to share and collaborate.
Getting started
First, you need to install it. Here’s a quick guide.
Once installed, you’re good to go.
Here’s some useful commands to get the ball rolling.
# Clone remote repo
git clone [repo_url]

# Initialise new repo locally and add remote
git init
git remote add origin [repo_url]

# Create & switch to new branch
git checkout -b branch_name

# Switch to existing branch
git checkout branch_name

# Stage changes
git add file_name

# Unstage changes
git restore --staged file_name
# or (older Git versions)
git reset HEAD file_name

# Check status
git status

# Commit staged changes
git commit -m "Some commit message"

# Push branch and set upstream (first push)
git push -u origin branch_name

# Push after upstream set
git push

# Pull latest remote changes
git pull origin branch_name

# Discard unstaged changes
git restore file_name

# Discard staged changes
git restore --staged file_name

# Undo last commit but keep changes staged
git reset --soft HEAD~1

# Undo last commit and discard changes (dangerous!)
git reset --hard HEAD~1

# Remove untracked files
git clean -f
git clean -f -r (also delete untracked directories, not just files).

# Remove tracked files
git rm file_name
git commit -m "Remove file_name"

# Apply commit from another branch/history
git cherry-pick commit_hash

# After conflicts during cherry-pick
git add resolved_file
git cherry-pick --continue

# Merge branch
git merge branch_name

# Resolve merge conflicts:
# 1. Edit conflicted files and remove conflict markers (<<<<<<<, =======, >>>>>>>)
# 2. Stage resolved files
git add resolved_file

# 3. Complete merge
git commit
Tips & Common Pitfalls
1. Commit Often, but Meaningfully
Make commits small and focused on a single change or fix. This makes it easier to review history and troubleshoot issues later.
2. Write Clear Commit Messages
A good commit message saves everyone time. Describe what you did and why, not just how. Avoid vague messages like “fix” or “update”.
3. Use Branches for Features and Fixes
Never work directly on main or master. Branches keep your work isolated and reduce the risk of breaking the stable codebase.
4. Always Pull Before You Push
Especially when working with others, pull the latest changes first to avoid surprises and merge conflicts.
5. Be Careful with git reset --hard
This command permanently deletes uncommitted changes. Use it only when you’re sure you don’t need those changes anymore.
6. Resolve Conflicts Calmly
Merge conflicts are normal, not a disaster. Take your time to understand what’s conflicting, and communicate with your team if unsure.
7. Avoid Committing Large Binary Files
Git isn’t optimised for big files like videos or large images. Use Git LFS or separate storage solutions if needed.
8. Don’t Stage Everything Automatically
Avoid commands like git add . without checking what you’re adding. Accidental commits of config files, secrets, or debug code can cause headaches.
9. Keep Your .gitignore Updated
Make sure to exclude files and folders you don’t want tracked (e.g., IDE settings, logs, build artifact’s).
10. Test Before You Commit and Push
Running tests or building your code locally before committing prevents broken code from reaching others.
Conclusion
Once you get the hang of the basic workflow and commands, Git quickly becomes an invaluable tool. Remember: use branches to isolate your work, commit thoughtfully, and don’t be afraid to ask for help when conflicts arise.
And let’s be honest if you’re not using Git or some form of version control, there’s an issue somewhere.

Bye bye.